Marlin GTX's Business Planner enables bookings to be added directly to planner time-slots or converted from customer enquiries, as required.
Bookings have a time slot allocated to them, and are highlighted on the Business Planner's Task List and Resource Planner in purple for quick identification.
GTX can be configured to add bookings directly to the Task List or Business Planner, without the need to first create and convert an enquiry. To change the default planner item, please contact the Megabus Support Team.
Converting Enquiries to Bookings
Main > Enquiries > Business Planner > Task List / Resource Planner
Enquiries can be converted to Bookings at any time, by opening them and clicking on the Change to Booking button at the bottom of the Add a New Enquiry pop-up window.
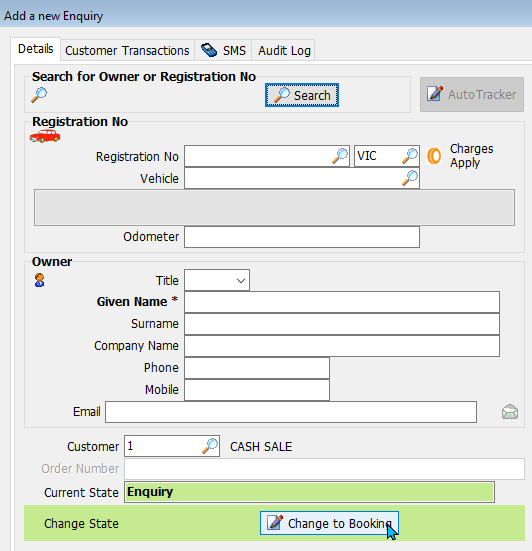
Once the Enquiry has been converted to a Booking, its date and time can be edited using the Task section to the top-right of the pop-up window (now called Add a New Booking).

A resource can also be assigned to the booking, using the Resource section below.

The rest of the customer and vehicle details can continue to be edited, as usual.
The mandatory Enquiry fields (e.g. Given Name) are not required to save a booking, but it must have an allocated time instead.
Bookings can be converted to Quotes, Work Orders or Invoices, by clicking on the buttons at the bottom of the pop-up window.

Adding New Bookings to the Business Planner
Main > Bookings > Business Planner > Task List / Resource Planner
To add a new booking to the Business Planner, double click on an empty slot in the Task List or Resource Planner.

Depending on the system configuration, either the Add a New Enquiry or Add New Booking pop-up window will open on the Details tab.
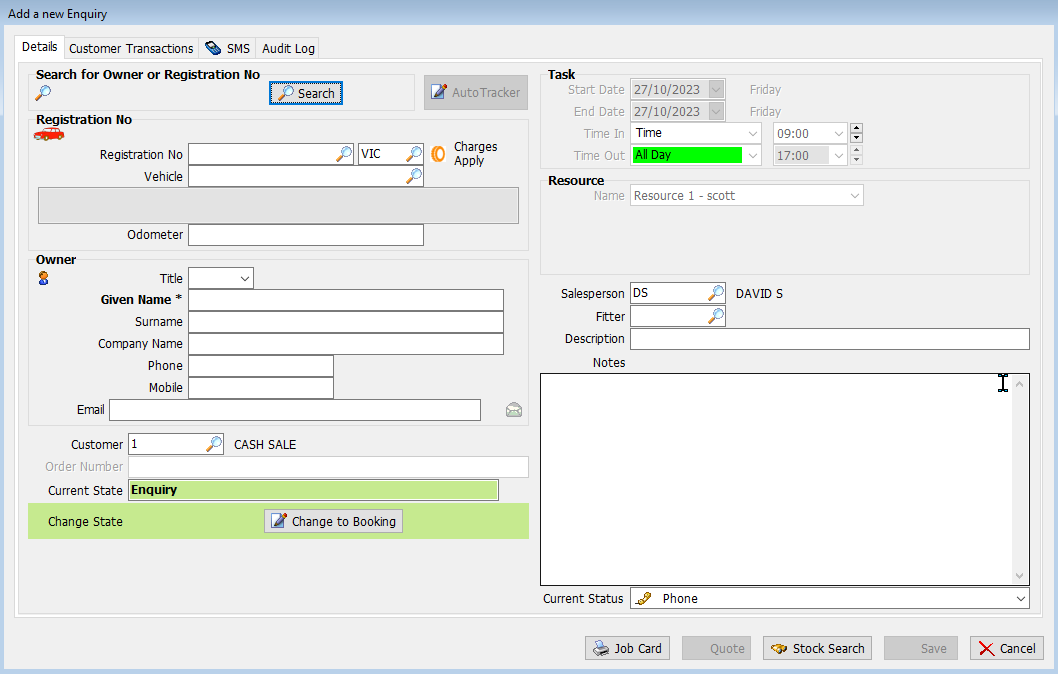
To convert the Enquiry to a booking, click on the Change to Booking button at the bottom left.

The information can then be edited the same as for when adding an enquiry.
Depending on the GTX configuration, the Business Planner may contain an Add an Enquiry and Add a Booking Button, or Add Item Button which can be further configured to add enquiries or bookings by default. To change the Business Planner's item settings please contact the Megabus Support Team.
Depending on the system configuration, Enquiries can also be added by right-clicking on an empty slot in the Task List or Resource Planner and selecting Add an Item or clicking on the Add an Item button in the Planner menu on the right of the Task List, if available.
Adding Bookings for Existing Owners or Vehicles
Main > Bookings > Business Planner > Task List / Resource Planner > Add > Details
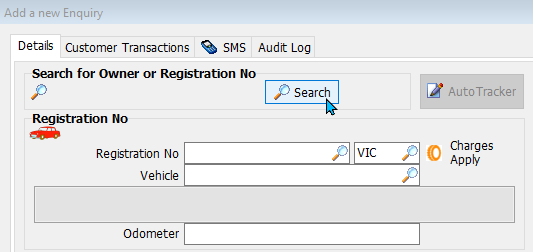
If adding an booking for an existing owner or registration, click on the Search button at the top-left of the Booking Details tab.
maybe a bit picky but the window in the screenshot is labeled for an enquiry not a booking
A pop-up window will open, which can be used to search for existing owners and vehicles.
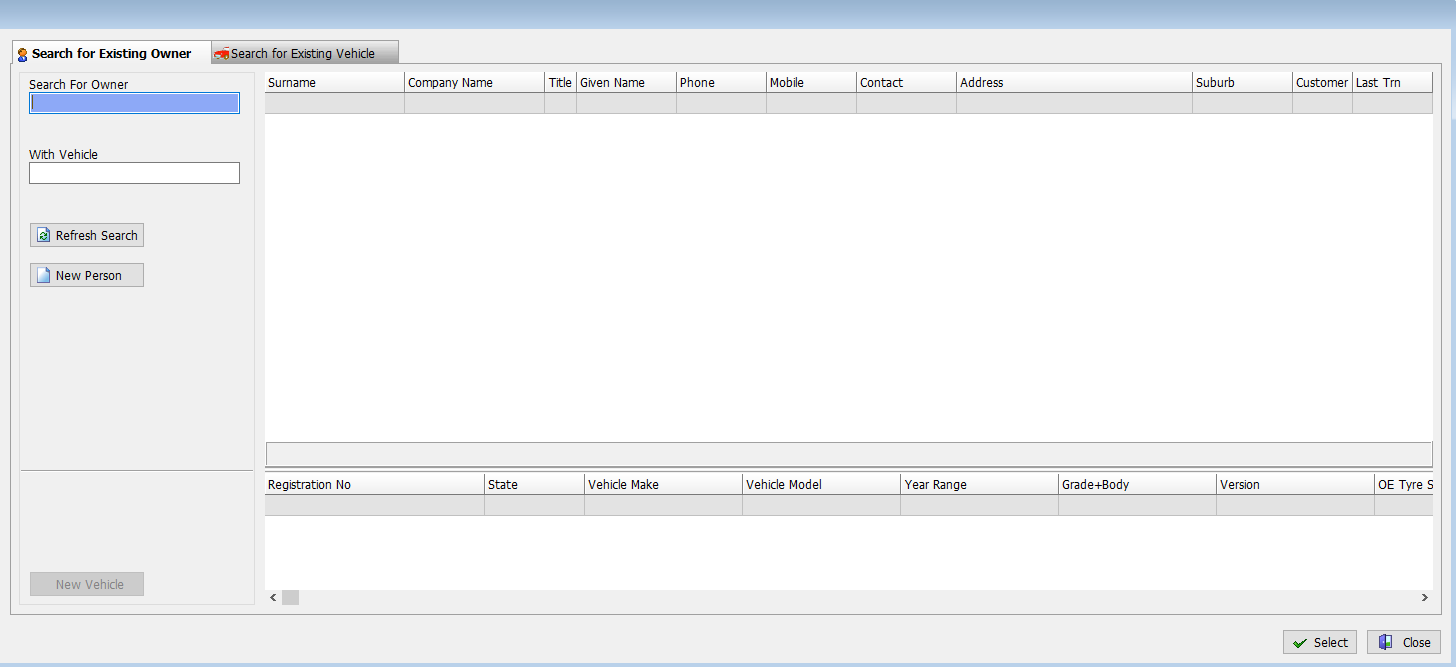
Once the desired owner or vehicle has been located and selected, click on the Select button at the bottom right to add them to the Booking.
Once existing owner or vehicle information has been added, it can then be edited, as needed.
Adding Bookings for New Customers or Vehicles
Main > Bookings > Business Planner > Task List / Resource Planner > Add > Details
If adding an booking for a new owner or registration, use the Registration No. and Owner sections on the left of the details tab to enter their information, as required.
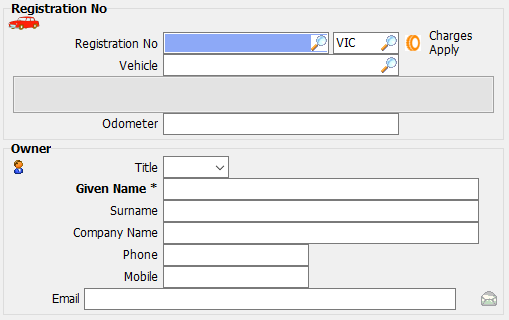
When entering a Registration No., you will need to press the Tab button the keyboard to exit the field, once you have made your selection, rather than clicking away, in order for the registration to be recognised.
If the Vehicle Logic LPN integration is enabled, you can click on the orange tyre icon to the right of the Registration No. field to perform a (charged) licence-plate lookup.
Adding Account Customer Bookings
Main > Bookings > Business Planner > Task List / Resource Planner > Add > Details
By default, the Customer field at the bottom-left of the Booking Details tab will be set to "1", representing a cash sale.
The booking can be associated with an Account Customer instead, by clicking on the picker and selecting them from the drop-down list.
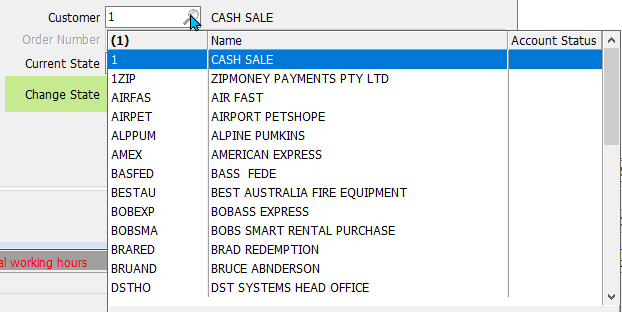
Once an Account Customer is selected, an Order Number can be entered in the textbox below, if desired.

if this is focussed on Bookings, the screenshots should be taken with a booking not an enquiry. The green should be purple
Previous account customer transactions can be viewed by clicking on the Customer Transactions tab at the top of the pop-up window.
If the customer has a mobile number associated with them, they can also be communicated with using two-way SMS, by clicking on the SMS tab at the top of the pop-up window.

Booking Tasks and Resources
A booking's date and time can be edited using the Task section to the top-right of the pop-up window.

A resource can also be assigned to the booking, using the Resource section below.

Bookings can be converted to Quotes, Work Orders or Invoices, by clicking on the buttons at the bottom of the pop-up window.

Booking Salespeople, Notes and Statuses
Main > Bookings > Business Planner > Task List / Resource Planner > Add > Details
The section at the bottom-right of the Booking Details tab can be used to select a Salesperson and/or Fitter for the Booking.
A Description of the work and any additional Notes can also be entered in the textboxes below, if necessary.
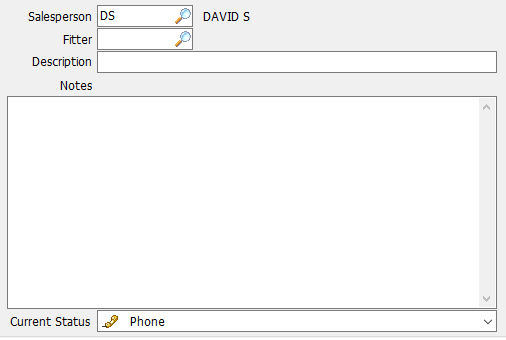
Use the Notes section to record any proposed stock to be used for the booking. Once the Booking/Booking is converted to a Quote, stock can be assigned to the order based on these notes.
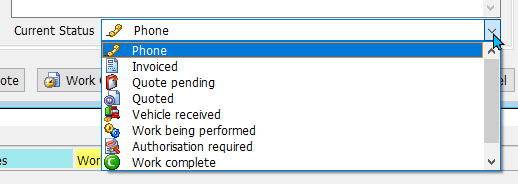
The booking's status can also be adjusted using the Current Status drop-down below.
Converting Bookings to Quotes, Work Orders and Invoices
Main > Bookings > Business Planner > Task List / Resource Planner
Bookings can then be converted to Quotes, Work Orders or Invoices by opening them and clicking on the relevant button at the bottom of the pop-up window.

Cancelled Bookings
Main > Enquiries > Business Planner > Task List / Resource Planner
- Bookings can be cancelled by right-clicking on them in the Task List or Resource Planner and selecting the Cancel Booking option.
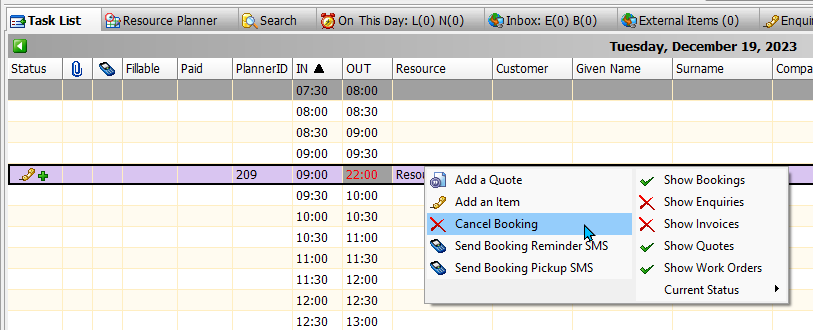
Bookings can also be cancelled by opening them and clicking on the Cancel button at the bottom-right of the Booking Details window.

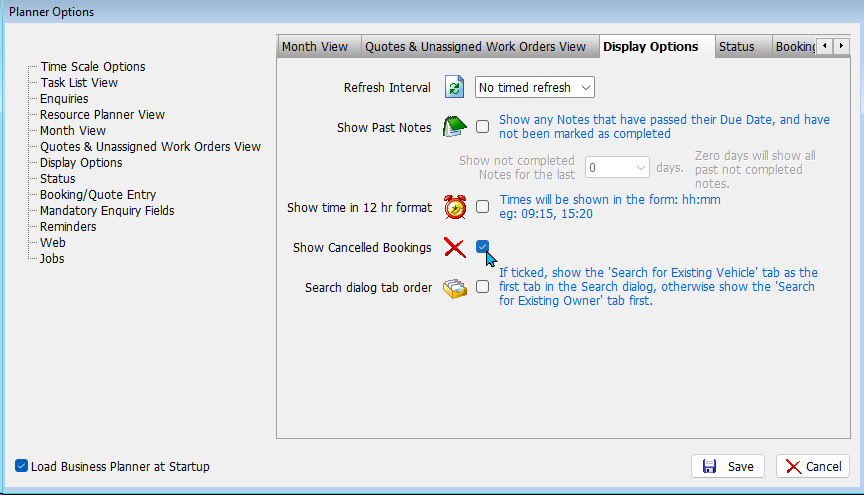
Whether Cancelled Bookings are shown in the Task List or Resource Planner can be toggled by clicking on the Options button at the top of the business planner, navigating to the Display Options tab and either ticking or unticking the Show Cancelled Bookings checkbox.
Reopening Cancelled Bookings
Main > Enquiries > Business Planner > Task List / Resource Planner
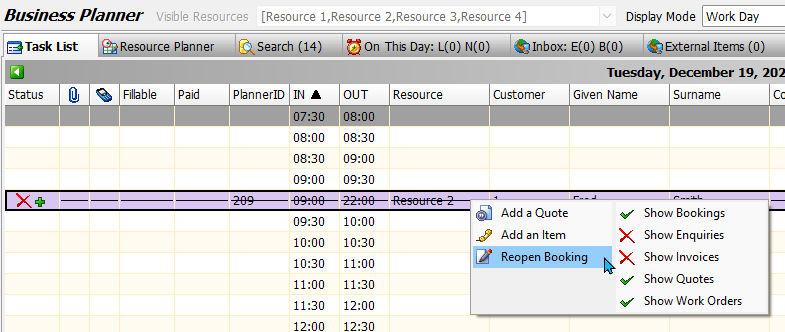
If cancelled bookings are visible in the Business Planner, then they can be ro-opened by right-clicking on them in the Task LIst or Resource Planner and selecting the Reopen Booking Option.
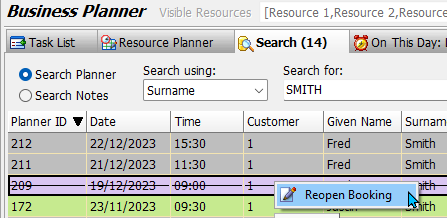
If cancelled bookings are not visible in the Business Planner, then they can still be reopened by searching for them using the Business Planner's Search tab.
Once the desired booking has been located, it can be reopened as usual by right-clicking on it in the search results and selecting the Reopen Booking option.
The planner Month View can be useful for monitoring cancelled bookings over a longer period.
