Marlin Tyre and Mechanical Workshop Software uses Journal Entries to keep track of transactions and transactions in the General Ledger.
Examples where journal entries might be used include:
- Adding take-on balances for customers, suppliers and stock when taking over an existing business or when switching over to Marlin from another accounting software.
- Recording salary and wage and payments.
Writing off bad debts.
To access the Journal Entries module, select Daily Activity > Journal Entry from the menu bar.

The module will open on the Search page, showing a list of current journal entries for the branch the user is logged in to.
The filters to the top-right can be used to switch between branches and to show different types of journal entries.
The different types of journal entry that can be shown are:
-
All journal entries.
-
Current journal entries, which have not been committed to the General Ledger or cancelled, and can be edited.
-
Closed journal entries, which have been committed to the General Ledger account and cannot be edited or cancelled.
-
Cancelled journal entries, which have been permanently abandoned without being submitted to the General Ledger and cannot be edited.
It is best to ask an accountant for help setting up and recording journal entries.
Adding Journal Entries
Daily Activity > Journal Entry
To add a new journal entry, click on the Add action button to the top-right of the Journal Entry Search list.

The Clone function can be used to quickly add new journal entries for regular payments, such as wages or salaries.
The Journal Entry window will open on the Details tab, containing a form for creating a new journal entry.
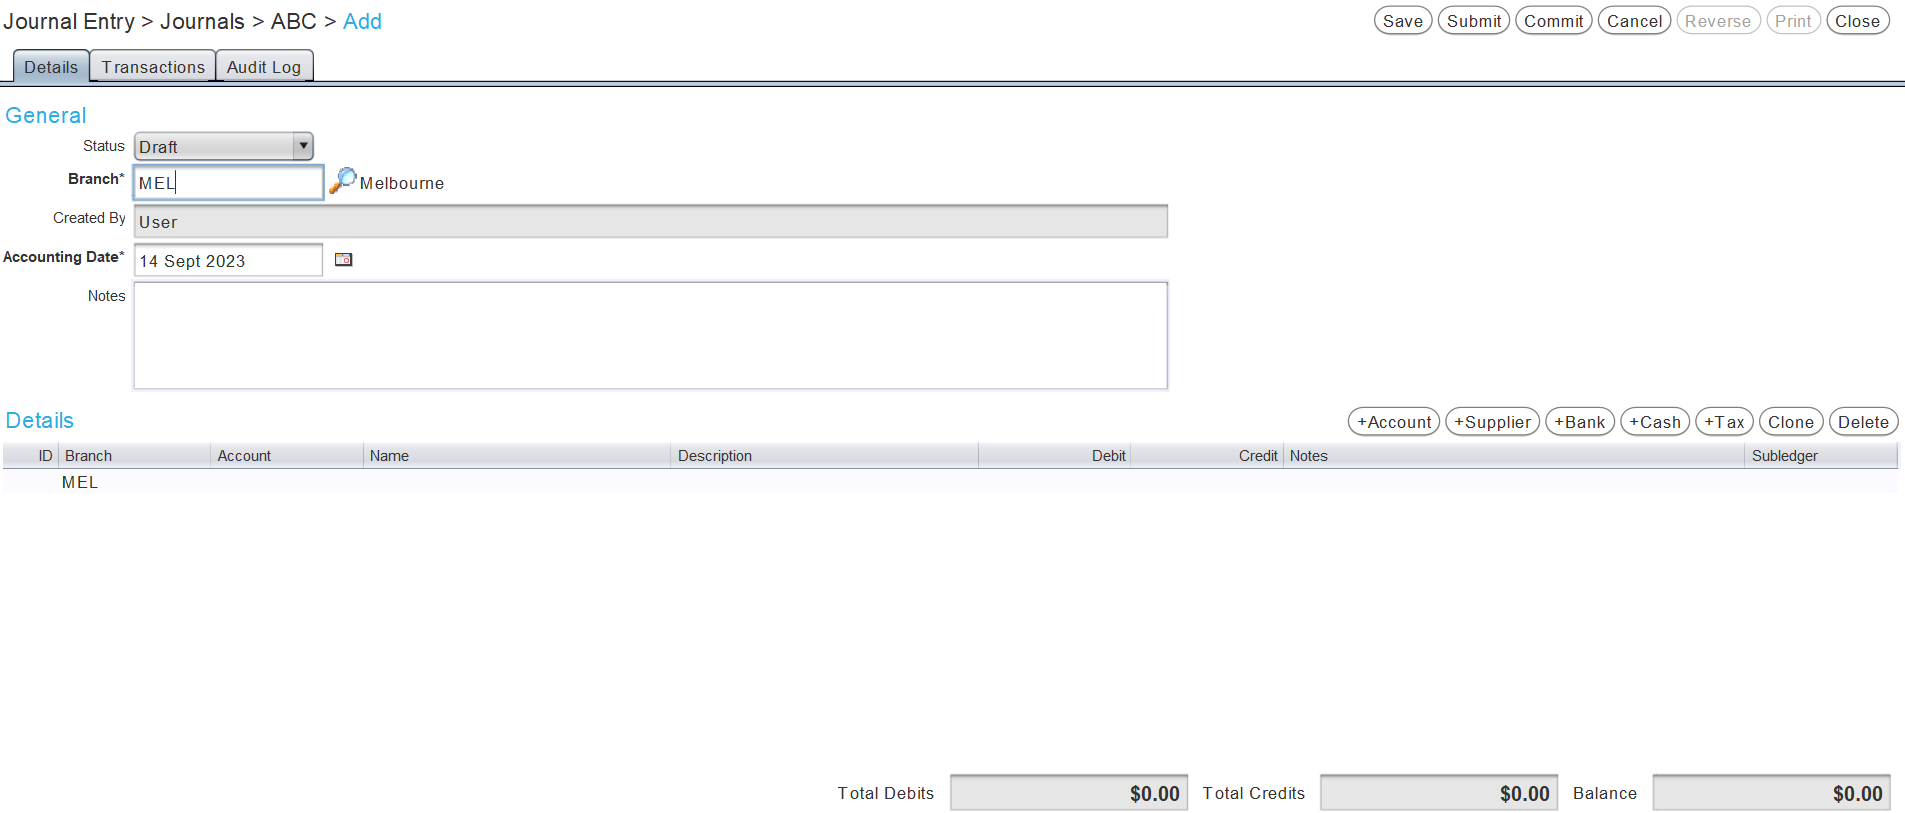
Use the Branch field picker to select from a list of branches from which to record the new journal entry.
By default, the Accounting Date is set to the day the journal entry was added, but can be edited using the calendar picker if necessary.
If desired, additional notes about the journal entry can be entered in the Notes field.
Comments for individual transactions can also be entered in the Notes column of the details list at the bottom.
If the notes column is left blank, it will be filled with the general notes entered in the Notes textbox at the top of the Details tab.
Journal entries cannot be committed without either something entered in the general Notes textbox, or notes entered for each of the transfer details.
Adding a Notes column to the Journal Entry Search list can be useful for identifying similar or repeat entries.
The Details list at the bottom of the journal entry Details tab can then be used to add payment details to the new journal entry.
GL Account Postings
Daily Activity > Journal Entry > [Journal Entry]
To add a general ledger account posting to a journal entry, click on the +Account action button to the top-right of its Details list, or click in the topmost empty Account column.
Use the Account cell picker that appears to select from a list of accounts to add to the journal entry.

To add the account information to the posting and return to the Details tab, click on the Ok button at the bottom right of the pop-up window.
In the Details list, enter the relevant amount in either the either the Credit or Debit column.
Specific information information about the transaction can be entered in the Notes column, if necessary.
Customer Account Postings
Daily Activity > Journal Entry > [Journal Entry]
Redo Style?
To add a customer account posting to a journal entry, click on the +Customer button to the top-right of the Details list.

The Edit Detail pop-up will open.
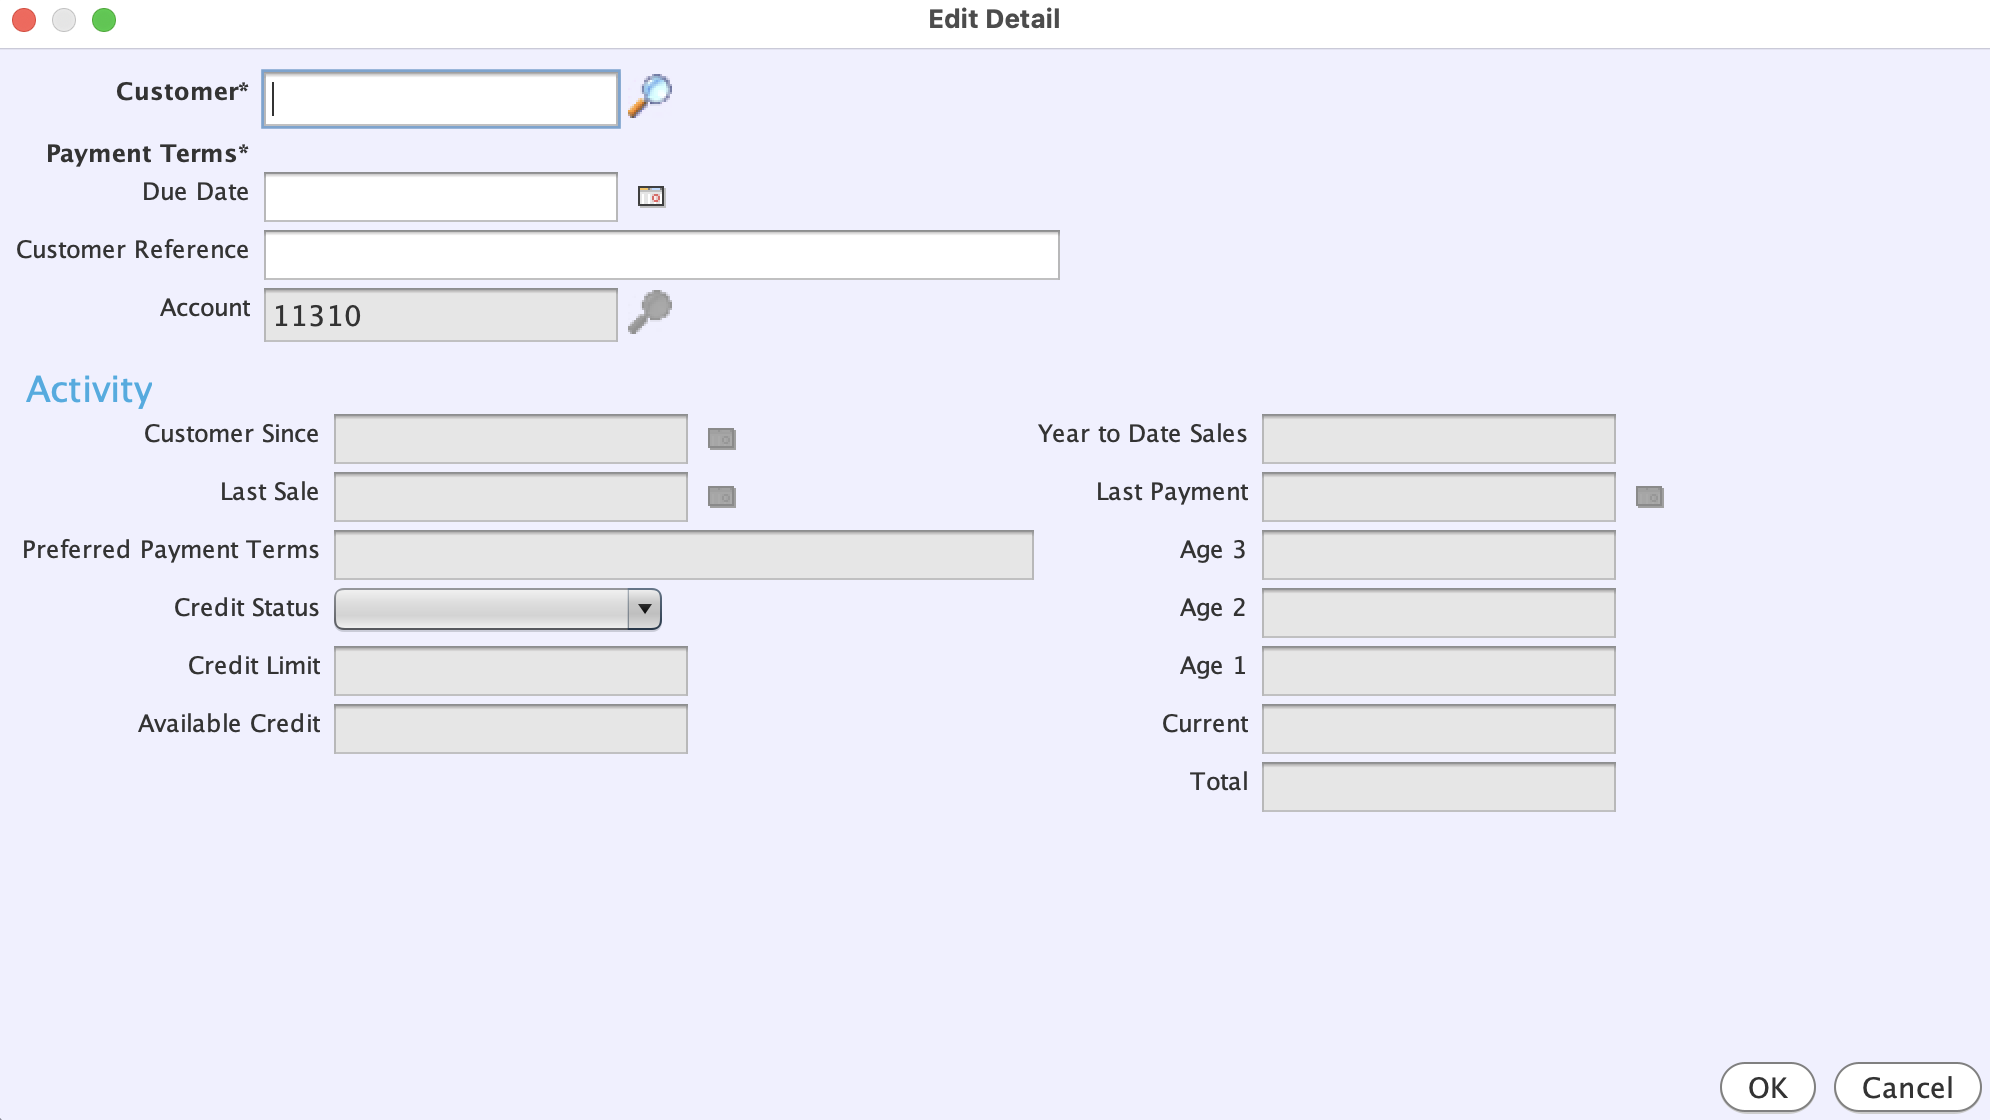
In the pop-up:
- Select the Customer
- Select the Payment Terms
- Adjust the Due Date, if necessary
- Enter a Customer Reference
- Click Ok (bottom right)
The new customer line will be added to the details list.

Enter Debit, Credit and Notes information as required.
Specific information information about the transaction can be entered in the Notes column, if necessary.
Bank Account Postings
Daily Activity > Journal Entry > [Journal Entry]
To add a bank posting to a journal entry, click on the +Bank action button to the top-right of its Details list.
A pop-up window will open, containing a form for adding bank account details to journal entries.
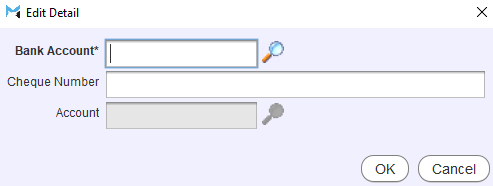
Use the Bank Account picker to select the bank account the posting will be made to/from.
If the transaction involves a cheque, enter the number of the cheque in the Cheque Number textbox, otherwise leave it blank.
The Account field at the bottom of the window will automatically display the GL account number of the selected bank account.
To add the bank account information to the posting and return to the Details tab, click on the Ok button at the bottom right of the pop-up window.
In the Details list, enter the relevant amount in either the either the Credit or Debit column.
Specific information information about the transaction can be entered in the Notes column, if necessary.
Cash Postings
Daily Activity > Journal Entry > [Journal Entry]
To add a cash posting to a journal entry, click on the +Cash action button to the top-right of its Details list.

Use the picker that appears in the Description List to select a Cash Register for the posting.
In the Details list, enter the relevant amount in either the either the Credit or Debit column.
Specific information about the transaction can be entered in the Notes column, if necessary.
Tax Postings
Daily Activity > Journal Entry > [Journal Entry]
To add details about tax paid or collected to a journal entry, click on the +Tax action button to the top-right of the Details list.
The Edit Detail window will open, containing a form for selecting the tax code.
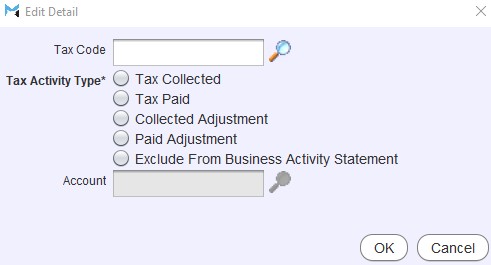
Use the Tax Code picker to select a tax code for the posting.
Use the Tax Activity Type toggles to select a posting types:
-
Tax Collected is tax received on a sales transaction or otherwise invoicing a customer.
-
Tax Paid is tax paid on purchasing orders or invoices.
-
Collected Adjustment is tax collected through adjustments, such as credit notes or discounts.
-
Paid Adjustment is tax incurred through adjustments, such as credit notes or discounts.
-
Exclude from Business Activity Statement will not record the tax transaction on the BAS and should only be used when paying tax to a government agency (e.g., the Australian Taxation Office or the US Internal Revenue Service).
To add the tax information to the posting and return to the Details tab, click on the Ok button at the bottom right of the pop-up window.
In the Details list, enter the relevant amount in either the either the Credit or Debit column.
Individual comments about the transaction can be entered in the Notes column, if necessary.
Supplier Postings
Daily Activity > Journal Entry > [Journal Entry]
To add a supplier transaction to a journal entry, click on the +Supplier action button to the top-right of the Details list.
The Edit Detail pop-up window will open.
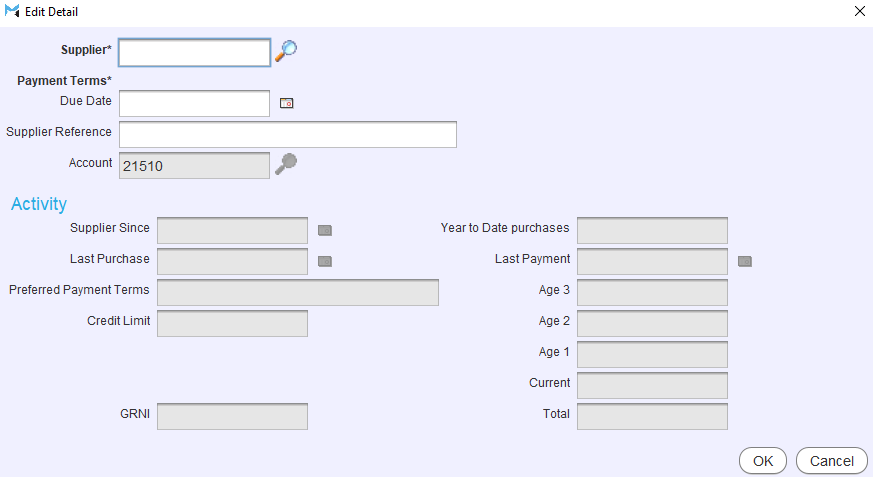
Use the Supplier picker at the top to select a supplier.
The Payment Terms information below will automatically be filled in, based on the selected supplier's account settings.
If the supplier transaction is a credit, use the toggles to select the payment terms or use the Due Date calendar picker to select a specific due date for the journal entry.
The journal entry will be posted to the Accounts Payable account, as shown in the Account textbox below.
The Activity section at the bottom of the Edit Detail window shows further information about the selected supplier's account.
To add the supplier information to the posting and return to the Details tab, click on the Ok button at the bottom right of the pop-up window.
In the Details list, enter the relevant amount in either the either the Credit or Debit column.
Individual comments about the transaction can be entered in the Notes column, if necessary.
When recording expenses through a journal (instead of Supplier Orders) any relevant tax amount must be add as a separate line.
Interbranch Postings
Daily Activity > Journal Entry > [Journal Entry]
By default, the branch on each detail line of a journal entry will be set to the one selected using the Branch picker in the General section at the top of the Details tab.
However, individual details can be assigned to different branches by using the Branch cell picker in the details list to select a different branch to assign the posting to.
Transactions between branches can therefore be recorded by selecting the first branch using the General Branch picker, and then selecting the second Branch using the Branch column of the Details list.

To distribute the expenses of a utilities bill paid by a head office between subsidiary branches, select the head office using the General Branch picker and add a detail line to the journal entry crediting the total expense amount to the head office. Then add other detail lines for each subsidiary's share of the expenses and use the Branch cell picker to attribute them to the relevant subsidiaries.
In order to preserve the integrity of the Trial Balance Report for Individual Branches, an opposite debit or credit detail is automatically generated for every interbranch posting, once a journal entry is committed. The account posted to when this occurs is usually called the Interbranch Control account. Its overall balance is always zero, but may be non-zero when viewed on a per branch basis. These balancing transactions are listed in the transactions tab and on printouts for the journal entry but do not represent actual postings or transactions.
The Subledger Cell and Pop-Up Window
Daily Activity > Journal Entry > [Journal Entry]
The subledger that a detail will be posted to is displayed in the Subledger cell at the end of the relevant detail line.
Clicking on the Subledger cell will open the Subledger pop-up window, containing notes on the selected subledger, as well as a drop-down menu of other active subledgers.
This information cannot be edited and is for informational purposes only.
Committing Journal Entries
Daily Activity > Journal Entry > [Journal Entry]
For a journal entry to be committed to the general ledger, its credits and debits must balance.
The Total Debits, Total Credits and Balance of a journal entry are displayed in the bottom right of its Details tab.
Once all the details for a journal entry have been entered and balanced, click the Commit action button to the top-right of the journal entry window.

The Commit pop-up window will open.
Use the Document Delivery Methods list at the top to generate a record of the journal entry, if desired.
To commit the journal entry to the general ledger, click the Commit button at the bottom right of the pop-up window.
Once committed, journal entries cannot be edited or cancelled. Incorrectly committed Journal Entries can be balanced by being reversed.
Audit Numbers and Journal Numbers for committed journal entries are displayed in the journal entry’s Transactions tab.
To require another user to approve the journal entry before it is committed, see the Inform guide on Journal Entry Approvals.
Cancelling Journal Entries
Daily Activity > Journal Entry > [Journal Entry]
To cancel a draft journal entry, first Open it from the Journal Entries Search list.
To the top-right of the Journal Entry window, click the Cancel action button.
The Cancel Journal pop-up window will open asking to confirm the cancelation.
To cancel the journal entry and return to the Search list, click the Cancel Journal button at the bottom of the pop-up window.
Reversing Journal Entries
Daily Activity > Journal Entry
Incorrect journal entries can be quickly rectified using the Reverse function, which creates a clone of a journal entry with its credit and debit amounts switched.
To reverse a committed journal entry, first Open it from the Journal Entry Search list.
At the top-right of the module window, click on the Reverse action button.

A reversed draft of the journal entry will open in Edit mode.
If necessary, changes can be made or additional postings can be added at this stage.
Saving or committing the reversed journal entry will then record it as a new journal entry in the Journal Entries list, balancing out the original incorrect posting(s).
Reversed journal entries can be discarded by clicking the Close action button to the top-right of the Details tab before they are saved or committed.