Marlin GTX enables users to compare and reconcile supplier statements with their recorded transactions, using the Supplier Statement Reconciliation module.
The Supplier Statement Reconciliation module also enables users to:
- Record notes for general reconciliations as well as individual transactions
- Add attachments electronic statements and other documents as attachments
- Search and filter transactions
- Allocate and Approve full or partial payments for individual transactions
Once finalised, the statement can be recorded as paid from within the Reconciliation module itself, or by using the Payments module as usual.
If enabled, reconciled statements for multiple suppliers can also be added to Bulk Supplier Payments and recorded simultaneously.
To enable Supplier Statement Reconciliation, please contact the Megabus Support Team.
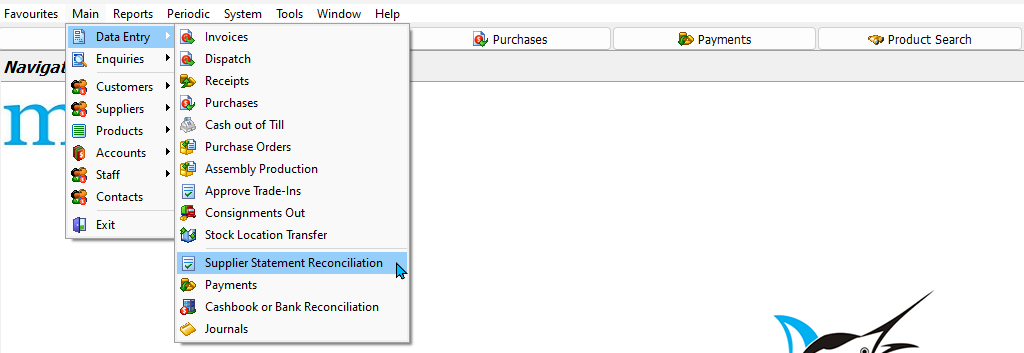
Once enabled, the Supplier Statement Reconciliation module can be accessed by selecting Main > Data Entry > Supplier Statement Reconciliation.
The module will open, showing a list of suppliers and their statement details.

Reconciling Supplier Statements
Main > Data Entry > Supplier Statement Reconciliation
Double-click on a supplier to open the worksheet screen, which can be used to reconcile their statement.
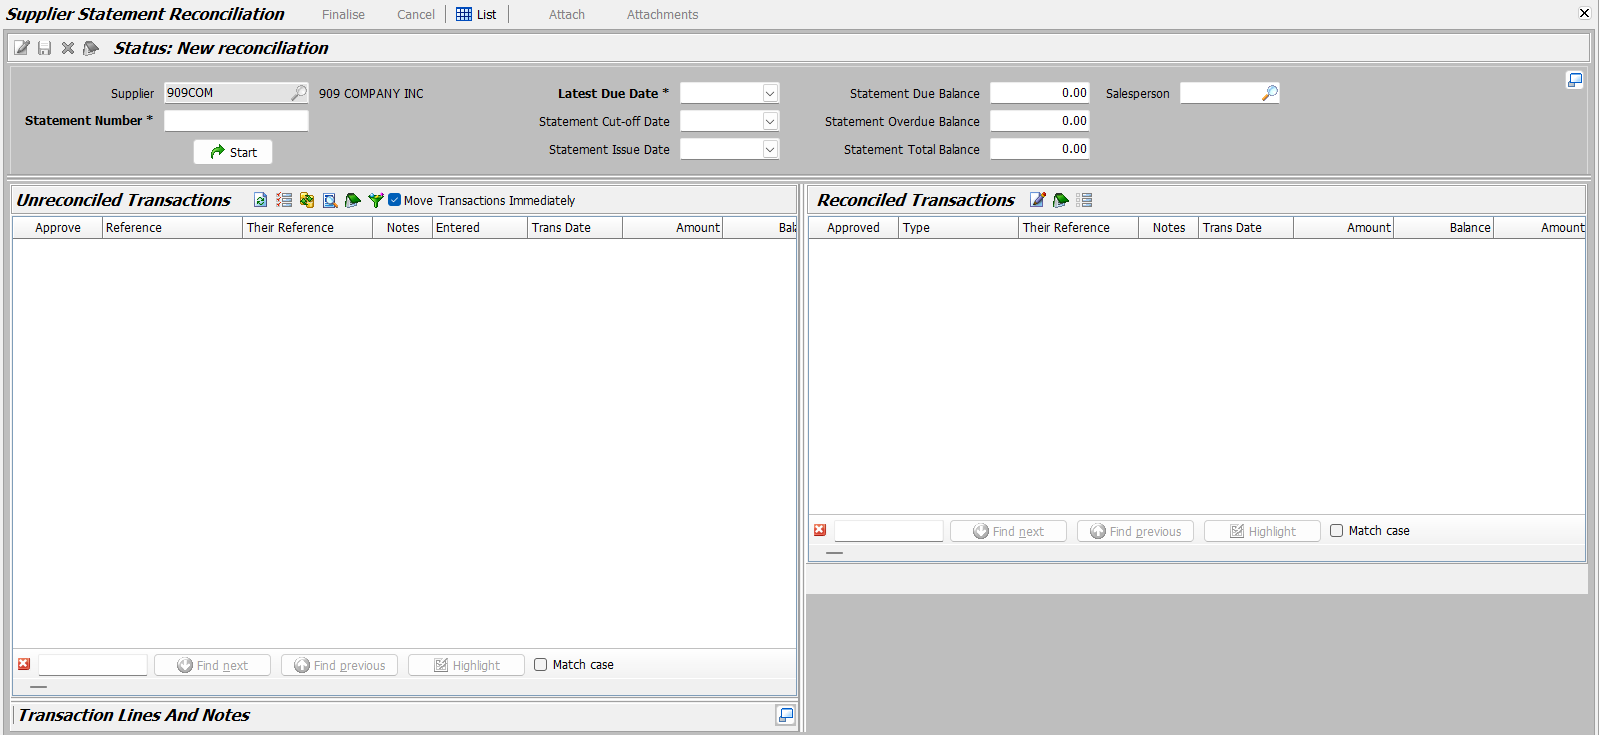
If the worksheet contains entries for a previous (finalised) reconciliation, click on the New Reconciliation button at the top of the module window.

In the section at the top, enter:
- Statement Number
- Latest Due Date
- Salesperson
- Statement Balances
To begin the reconciliation:
- Click on the Start button at the bottom-left.

The supplier's contact information, purchase dates and account balances can be shown or hidden by clicking on the Maximise/Minimise Details button in the upper-right corner of the screen.
The Unreconciled Transactions lists below will update, showing the supplier's outstanding transactions, up to the selected due date.

Compare the entries on the supplier's statement to those listed in the Unreconciled Transactions:
- Check-off matching transactions by ticking the Approve checkboxes to their left.
- Selected transactions will move to the Reconciled Transactions list on the right.
- Note: Further transaction details can be viewed by double clicking on them, or by clicking on the Details button at the top of the Unreconciled Transactions list.
The Reconciliation Total section at the bottom-right will be updated accordingly.

Whether checked transactions are transferred to the Reconciled Transactions list immediately or need to be moved manually can be controlled using the Move Transactions Immediately checkbox at the top of the Unreconciled Transactions list. This can be useful when comparing it to the list on a supplier's statement.

If the checkbox is not ticked, approved transactions can be moved over at the end, by clicking on the Blue Arrow buttons that appear between the lists (shown above).
-
All of the unreconciled transactions can be checked-off at once, by clicking on the Select All button at the top of the Unreconciled Transactions list.
-
All of the reconciled transactions can also be unchecked at once by clicking on the Unselect All button at the top of the Reconciled Transactions list.
-
Transactions can also be filtered by various criteria, such dates and transaction type, by clicking on the Filter button at the top of the Unreconciled Transactions List.

Adding Transactions
If the supplier's statement includes a transaction that is missing from the list of Unreconciled Transactions in GTX, then it needs to be added manually, as either a supplier invoice, credit note, or journal entry (using the relevant module).
The transaction will then be added to the Unreconciled Transactions list, and can be checked-off as usual.
If the supplier reconciliation worksheet is already open and you don't see the transaction, click on the Refresh button at the top to refresh the list.

Previous Payments
If there are transactions on the statement that have already been recorded as paid, these will not appear in the Unreconciled List and may affect the reconciliation total.
Previous payments can be added to the reconciliation by click on the Edit Already Paid button, in the Reconciliation Total section at the bottom-right of the module window.

A pop-up window will open, showing a list of previously recorded Payments.

In the Payments pop-up:
- Tick the checkboxes for any payments made toward the current statement
- Checked-off payments will move to the Payments Made list on the right
- To edit a payment amount: select it in the Payments Made list and click on the Edit button at the top.
- Verify that the selected payments should be included in the statement total
- Click OK (bottom-right)
The reconciliation total will be updated accordingly.
Searching Transactions
Transactions can be searched for by reference number, date, or amount, using the Search fields at the bottom of the Unreconciled and Reconciled Transactions lists.

Transaction Filters
The Unreconciled transactions lists can also be filtered, using fields like Date, Amount, Balance, Reference and Transaction Type, by clicking on the Filter button at the top.

Use the pop-up that opens to select and apply the desired filter options.
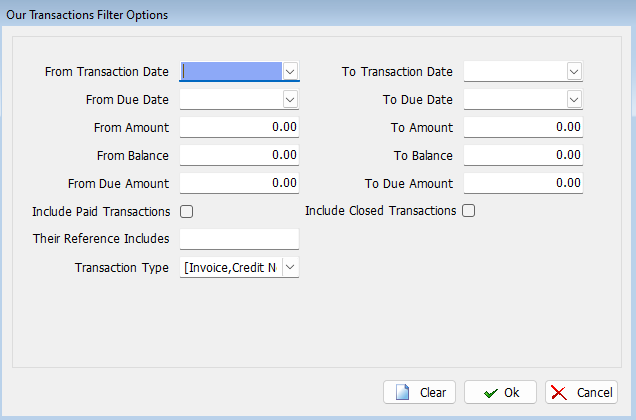
To remove a filter:
- Re-open the filter window (filter icon)
- click on the Clear button (bottom-right)
- click Ok.

Approved Payment Amounts
The Supplier Reconciliation module enables you to edit approved payment amounts for individual transactions.
This can be useful when disputing a charge, or in other situations where you want to withhold a payment.
To edit approved payment amounts:
- Select the transaction in the Reconciled Transactions list
- Click on the Edit Approved Amount button at the top

In the pop-up that opens:
- Enter the New Approved Amount
- Click Save
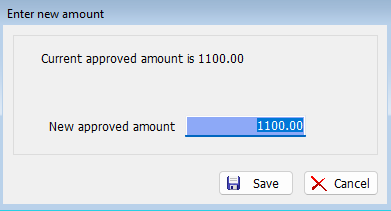
The new amount will be updated in the Approved column on the right.

Statement Attachments
Electronic copies of the relevant statement or other supporting documents can be added to a reconciliation by clicking on the Attach button at the top of the module window.

Reconciliation Notes
Notes can be added to general reconciliations, as well as individual transactions.
Once added, notes can be viewed again by clicking on the relevant Notes button, either at the top left of the module window, or the top of the relevant Transactions list (see below).
General Notes
General notes can be added to a reconciliation by clicking on the Notes button at the top-left of the reconciliation window.

The Statement notes pop-up window will open.
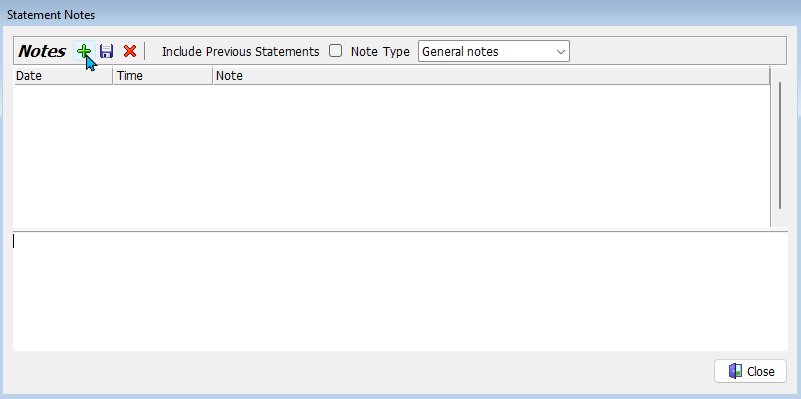
To add a new note:
- Click on the Add button at the top
- Enter the note in the textbox below
- Click on the Save button at the top
Existing notes can be deleted by selecting them in the pop-up and clicking on the Delete button at the top
Notes for previous reconciliations for the same supplier can be shown by ticking the Include Previous Statements checkbox at the top of the notes pop-up window.
Transaction Notes
Notes about individual transactions can also be added by selecting them (in either the Unreconciled or Reconciled Transactions lists) and clicking on the Notes button at the top of the relevant list.

Add the note using the same method for general notes (described above).
The number of notes added to a transaction is shown in the Notes column of the relevant list, and can be viewed by clicking on the relevant Notes button again.

Tip: General notes can also be viewed from within the transaction notes window, using the Note Type drop-down at the top of the Notes pop-up.
Notes can also be viewed by clicking on the Maximise/Minimise Details button at the bottom right of the transaction list and clicking on the Notes tab at the top of the section that opens below.

Finalising Reconciliations
When you're ready to finalise the reconciliation, click on the Finalise button at the top of the module window.

Make sure a Salesperson is selected in the section at the top, before finalising the statement.
Statement Differences
Statement reconciliations can be finalised with overpay or underpay amounts.
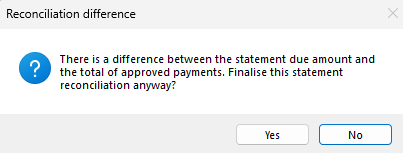
If there is a difference between the Statement Amount Due and Total approved payments (shown at the bottom-right), you will be asked to confirm whether you want to continue with the finalisation:
- To cancel the finalisation and continue with the reconciliation, click No
- To finalise the reconciliation as is, click Yes
Cancelling Reconciliations
Main > Data Entry > Supplier Statement Reconciliation
Active and finalised supplier statement reconciliations can both be cancelled.
To cancel a reconciliation, open the relevant supplier from the main suppliers list in the Supplier Statement Reconciliation module.
The worksheet for the previous reconciliation will be shown, with its status set to either In Progress or Finalised.
To cancel the reconciliation, click on the Cancel button at the top of the module window.

If another reconciliation is already in progress, it can be saved and returned to later by clicking on the Save button to the top-left.
Recording Payments
Main > Data Entry > Supplier Statement Reconciliation
Once finalised, supplier statements can be recorded as paid from within the Reconciliation module.
To record a supplier payment:
- Re-open the supplier's reconciliation
- Click on the Pay button at the top of the Finalised reconciliation window.
- If prompted, enter your salesperson ID and password to continue

The Payment Details pop-up will open.
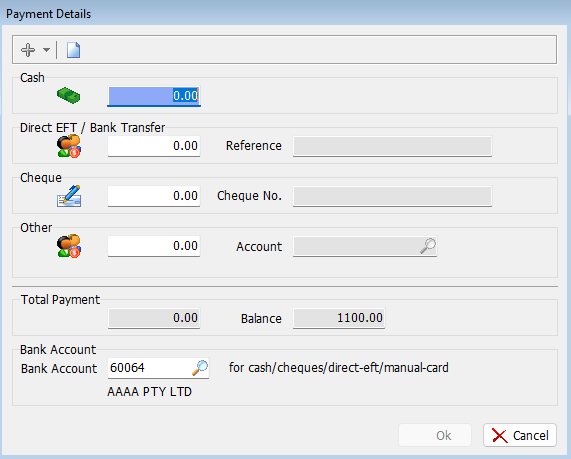
On the Payment Details screen:
- Enter the payment method and amount.
- Click OK.
The reconciliation window will close and the supplier's status will update to Paid in the statement reconciliation list.
When recording payments from the Supplier Statement Reconciliation module, the payment is recorded with the current date and GL period.
Reconciled allocation payments can be recorded with different dates and periods by adding them to the Payment Entry module, which can also be used to apply settlement discounts.
Reconciled supplier allocations can also be added as part of Bulk Supplier Payments.
Payment Entry
If required, reconciliation allocations can also be added to and recorded using the Payments module (Main > Data Entry > Payments).
This option can be used when you need to change the payment date or GL period, or apply a settlement discount when paying a supplier.
If a payment has already been recorded using the Reconciliation module, then it does not need to be recorded separately, using the Payments module.
In the General section at the top of the Payments screen:
- Select the Supplier
- Update the Payment Date and GL period, if required
- Enter your Salesperson ID

In the Line Details list below:
- Click on the Add Allocation button at the top
- Select Reconciled Transactions

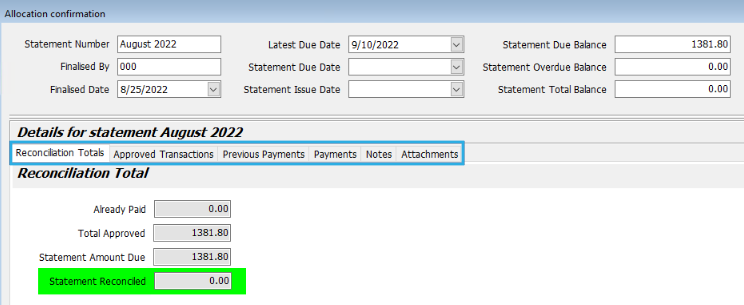
The Allocation Confirmation screen will open, showing the details of the supplier's reconciliation.
this didn't actually open for me?
Review the entries on each of the tabs, as required.
To update the payment with the reconciliation information:
- Click on the Allocate button (bottom right)
The following information will be updated:
- Amount Paid: added to payment header
- Statement Date/Description: Added to Comment field
- Payment Allocation Amounts: Updated in Line Details list
Once ready, the payment can be finalised as usual, by clicking on the Finalise button at the top of the Payments window.
Bulk Supplier Payments
Main > Data Entry > Payments
If you have reconciled the statements for multiple suppliers, you can use the Bulk Supplier Payments module to simultaneously record their payments.
If enabled, Bulk Supplier Payments can be accessed by clicking on the Bulk Supplier Payments button on the left of the Payments module.

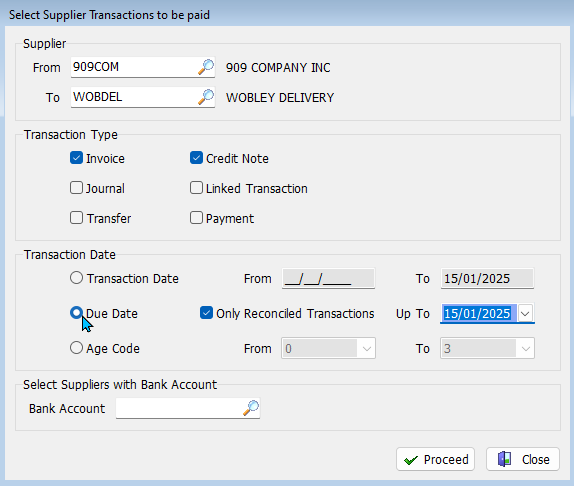
Click on the Add button at the top, to open the Select Supplier Transactions pop-up.

In the Transaction Date section
- Select the Due Date toggle
- Tick the Only Reconciled Transactions check box, to the right
- Enter the due date in the Up To field
- Click Proceed (bottom-right)
Review and update the allocation and settlement discount amounts, as required.
Once ready, the payment can be finalised as usual, by clicking on the Finalise button at the top of the Payments window.


